Tuesday, August 31, 2010


Labor Day Family Activities

Labor Day is celebrated on the first Monday in September. It's a day dedicated to the social and economic achievements of American workers. It became an official holiday in 1894. During this time we usually celebrate with summer activities like swimming, cookouts or maybe even camping.
 I love all of the above, but I don't know about you but, sometimes I  just want to stay home and spend time with the family and as a family,do things for the hard workers in our community. So I have listed a few activities that you and your family can do, just in case you want to stay in and do the family thing.


Good Work Sign

Have the kids remind their favorite worker of the good work they have done by letting them make a "GOOD WORK" sign. This could be a neighbor next door. Use foam board for the actual sign. Write the words "GOOD WORK", decorate with glitter pens, markers, ribbon, stars, etc. You could even present it to them with a batch of homemade cookies.

Labor Day Shake Ups

You will need:
2 paper plates
scissors
1 ziplock bag (close to the same size as plate)
glitter
patriotic confetti (if you have, I just used what I had around the house)
ribbon cut in small strips (I used red)
dry beans or rice
staples
markers

Directions
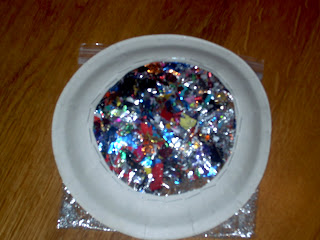
Cut out the center section of one plate, discard center. You can use any paper plates you have. I only had these little mermaid plates. So whatever you have will work.


   Fill the ziplock bag with glitter, ribbon pieces and confetti. You have to fill the bag up so that when you lye it on your work surface it is one layer. Do not make it bulky. Zip it shut. Take the paper plate with the hole in it, turn the plate over so that the bottom of the plate is facing upwards towards you. Now center the ziplock bag under the hole. Staple it to the plate(around the opening), making sure to place the staples right next to each other around the circle. Any corners of the bag will be tucked inside in the final step.


Now take the second plate and staple different lengths of ribbons  to the sides, this is just to give a little decoration to it. The step is optional.


Now pour the beans or rice in the second plate (without the hole) Place the plate with the see through window over the top of the beans tucking any corners inside, and staple shut. Again making sure that the stables are close together, so the beans will not fall out.


Now decorate as you please, Glitter was all I had, You can use markers, more ribbon etc.
Now you're ready to Shake Shake Shake!!


LABOR DAY PICTIONARY
Supplies:
paper (any size)
pen or pencil
bowl
scissors

Directions
On a sheet of paper write down different jobs that people have, police officers, firefighters, store clerks, mailmen,etc. Think of about 20 jobs
Cut the jobs out on strips, fold them up and place them in the bowl
Pick one piece of paper out the bowl without letting the other person see what you've picked. Draw a picture of the job you picked on the paper. Keep drawing until your partner guesses the image. Take turns picking and drawing. Another idea would be if you have enough family member, you can make teams and play against each other. The losing team have to cook dinner one night. Make it fun!


        STARS AND STRIPS EDIBLE CRAFT
This is a fun and easy snack

Ingredients:
7 twizzlers
mini marshmallows
blue fruit roll up

Start with a red horizontal twizzler
Then add a row of mini marshmallows
Repeat until you have 7 rows of red
Cut the blue fruit roll up into a square and place in upper left corner
Enjoy!


A few more ideas:

Make sugar cookies, use a rectangle cookie cutter and once they are baked and cooked off. Decorate them like flags with icing. Enjoy as a family or deliver them to a hard working neighbor.

Have family cookout

Make a flag craft

Get creative and just have fun with your family. It's not everyday everyone is at home during the day. Enjoy this day off (if you're blessed with the day off) with your family.



Saturday, August 28, 2010

Simple last minute "1st Day of school" party for your Kindergartner

As a parent, we all dread that first day of school for your new kindergartner. Exspecially if you have been a stay at home mom and they have been at home with you their entire short life. I know when my oldest started school, I was a mess!!! I mean I was holding back tears like she was going to war. That lump in my throat grew bigger and bigger, and I just knew I was going to break under the pressure. Just watching her big eyes fill up with tears, and she trying her best not to burst out in tears, just made it even worse.  I just wanted to grab her and not let go. They will have to pull us apart like the scene in Color Purple where Mista was trying to pull Nettie and Cellie apart. "You and me us neva' part". LOL, Baaaaby, It was awful!
 Happy to say that today Jasmine recently turned 10 and was not traumatized by that huge milestone 5 years ago.
 But while I was at home with my second daughter Keyana, who was almost 3 at the time. We really didn't know what to do with ourselves, seeing that we were used to Jasmine been there. So I came up with the idea of having a small party, (just us) to commemorate Jasmine starting school. Also I knew it would make her a little more excited about school. So we made quick trip to the store to get some cake mix and icing. Came back home, baked and decorated a little. I just draped streamers in the hallway leading to the party table.
 I then covered the table with a tablecloth and sprinkled confetti and went upstairs to her room and invited some fun guest. I got some of her favorite stuffed animals and sat them around the table around the cupcakes. I also added her hospital picture when she born. And out the door I went to pick her up.
 When we arrived back home I let her enter first. And said to her before she got all the way in "look whose here", she came around the corner in suspense wondering what I was talking about. She was soo surprised.

So this is just quick little something you can put together and your child will love it. Not saying that the second day of school will be better for them or you, but those cupcakes will do the trick for now.
The Table

The hallway


Jasmine coming down the hall


Blowing out her 1st day of school candle


I also did the same for Keyana when she started school in 2008. She is now 7 years old

Keyana's Table


Keyana


Keyana blowing out her candles


Keyana enjoying a well deserved cupcake


Thursday, August 26, 2010

Hello Kitty


Hello Kitty

Ya know... I don't really know what's up with this quiet kitty...is she really quiet? She's has to be seeing she doesn't have a mouth. Who knows. All I know is that she has some of the coolest accessories. I mean the Hello Kitty booth in the mall where I live, is soo eye catching to any age that you must stop. Exspecially if you are like me and love the color pink. There's pens, pencils, notepads, change purses, all kinds of goodies that you don't really need, just things you really want.
 Anyhow I decided to do Hello Kitty because she sort of reminds me of myself when I was growing up. In school I said not a single word. From grade K to grade 6, not a single sound come from my mouth. So I know people were thinking "whats wrong with her" or "It's like she doesn't have a mouth".   With that said, I am proud to announce that I have overcame the "Hello Kitty" stage (actually about ***teen years ago) lol. But I will always have a mysterious connection with Mrs Kitty. Meow Meow. Oh wait she doesn't have a mouth. LOL.

Decorations

Pink and white streamers lining the walls from corner to corner. Tape up about every foot and a half, this will form wide "u's" to give it more festive look. Add 2 or 3 pink and white balloons in every corner with curling ribbon hanging below the balloons.

Take white posterboard and make Hello Kitty heads to the walls. She is pretty simple to draw and cut out. For the eyes you can add a little glamour to them by using glitter paper(craft stores) for the eyes and for her bow. Or instead of the bow you can make a festive party flower since it is a party.

You can also make or purchase little pink or black kitty paw prints to have them leading to the party area and then up the sides of the walls to fill in empty spaces.This link is actually dog pawprints and are a little bigger , but you want them to be big .Set of 24 Dog Paw Prints Wall Art Vinyl Graphic Stickers Decals
You can also make a happy birthday sign or banner. Make it in the shape of her head with bow. It could say something like "Happy 3rd Birthday Mary" Or you can purchase this bannerHello Kitty Balloons Dreams Happy Birthday Letter Banner
Cover front door with pink Bulletin board paper or wrapping paper, and put a huge Hello Kitty face or body on top of the paper. Very cute.

For the tables add a pink tablecloth and confetti, a hello Kitty doll for the centerpiece tie balloons to her or let the cake be the centerpiece. If you have any little Hello Kitty knick knacks or little toys place them on the tables also.
You can also tape streamers to the sides of the tables in the same way you did the streamers on the walls, tape up every foot til it completely around the table. Make 4  nice size bows out of white and/or pink ribbon and hot glue curing ribbon (about 6 string each) to the back to the bow and then glue or tape (strong tape) the bow/ribbons to the corners of the tables.

A few activities

Have the guest where pink bows

Make kitty ears. Purchase in expensive plastic headbandsExpressions School Wear Plastic Headbands (Set of 12) - one color, one size  white glitter pipe cleaners and posterboard. Simply let the kids take the glitter pipecleaners and wrap them around the entire pipe cleaner.Hot glue the ends, (it will takes about 7 or 8 so make you sure you have enough for each child) then have them cut out pre-made kitty ears (made by you) and with help from an adult, hot glue the ears to the top of the head bands. Don't forget the bow. You can purchase pink ribbon and tie in a bow first then glue to ear.

Purchase face paint and turn them all into Hello Kitty
 
I hope you find some or all of these decorations helpful.  Have fun and let your imagination go wild. I would love to see your decorations. Send them to crisha31@gmail.com so I can post them on my blog. Have fun!!!


Sunday, August 22, 2010

Barbie Party Ideas


First, and foremost, I have two barbie lovers in my home, Jasmine 10 and Keyana 7, and my 2 year ol Ericka has almost joined the crew, but she is not quite there yet. So when I decided to do the Barbie decorations, my oldest daughter claimed the decorations for her room. Which Keyana shouldn't have to worry, seeing that they share the same room : ).
However this decoration can also be for a girls night in/out or spa party. Or whatever girlie girl party you are throwing.


                                                               Decorations

For the decorations I would make the Barbie logo(above) and put them all over the wall. I made the ones above out of construction paper. Pink and lavender is Barbie's signature colors so you could use pink and lavender streamers on the walls. Tape the streamer to the desired place on the wall, as you pull the streamer off the roll turn the roll clockwise to give the steamer a twisted look. Tape two different colors of streamers (placed side by side) to the desired place on the wall and do the same technique. This will give it a two-sided color look. Although trying to turn two rolls of streamers will be a little tricky, but you can do it.

For the tables I would suggest maybe a barbie doll (one that your daughter already has) with a full size dress on that matches the decor. Place her right in the center of the table(you can purchase a doll stand at craft stores. It won't be seen because you will place it under her dress) with silk or real pink and lavender flowers surrounding her. A pink or Lavender tablecloth would be perfect. With matching confetti sprinkled all over the table. You may also add some loose flowers to scatter on the table. Matching balloons may also be added.

If your daughter have plenty of barbie dolls, they can work as the decorations in the party area. Place barbies everywhere. On the mantels, the window seals, on tables, stands. Any place that you can possibly think of. You can even have barbie toys( castles, cars,etc) sitting out to keep the early arrivers busy. This is if your child is willing to share her precious Barbies. A television with Barbie movies could be playing. Honey, I could go on and on. Just have fun with your decorations and I promise you, you will amaze yourself and the party guest.


                                                           Crafts and Activities


We all know how glamorous Barbie is, so why not have a booth set up where the girls take glamour shots. If you are good at applying make-up...great! But if not you may have a friend or family member who is good at doing make-up or you can hire someone.

A craft would be making their own jewelry. Purchase some shiny glittery beads, fun shaped beads and some stretchy string (in the jewelry making section at the craft stores). Maybe some charms that they each can have one for their necklaces. They can also make bracelets if you have enough beads. You may also want them to take their glamour shots in their new handmade jewelry.

You can also send a note in the invitation asking each guest to come dressed like a barbie.

You can purchase inexpensive wooden picture frames, glitter pens, glitter stickers and all kinds of glittery goodies. Then have the kids decorate a beautiful picture frame.

Lastly you could let the girls go on a scavenger hunt. You will hide all kinds of accessories( hair bows, lipstick, headbands,etc). These can all be purchased at the Dollar Store. Give the girls a list of everything that you have hidden.Give them about 10 minutes(at the most). The one who finds the most in 10 minutes wins a prize.


I hope these ideas help you out while planning your party. Believe me even though I may not know you, believe me I seriously wish that I could come and party with ya. I love to see the smiles on children's faces when they see their favorite characters all over the walls and on their cakes. Priceless!!

                                                       Have fun!!

Search Amazon.com for barbie party supplies
Search Amazon.com for barbie invitations
Search Amazon.com for beads for kids

Tuesday, August 17, 2010

Thomas the Train and Friends


Thomas and Friends

To be honest, I nor my children have never been big fans of this "cheeky" tank engine. However his theme song can be a little catchy. There's two, there's four, there's six, there's eight.. okay I'll stop, but I do like the song.  I do have a nephew who is pretty into Thomas the Train. After seeing him and all of his little Thomas and friends toys a few weeks ago, I can seriously see why they are addictive. I mean they were lighting up, talking and made beeping noises, just like on television. I seriously didn't want any other kids playing with his toys because I saw how much he was into those little trains. And God forbid any one of those trains came up missing...baaaby, no one would have left the building until Thomas or who ever his missing friend was. Be it Emily, Percy, or Gordan, they were gonna be found before anyone left. That's all I'm saying.
So my little nephew Issac is my reason for sharing these fun party decorations and tips.


                                            Decorations
 Get guest anxious about entering the party room, by putting a tunnel (as seen on Thomas) right before you enter the party room. Simply take a black curtain, hang it  in the doorway, take some red foam board make some red brick shapes out of them (don't forget to add detail),   Make enough to go around entire door frame.  Start forming an arch when you are about 6 inches from top of  the side frames, this keeps the brick frame from going onto the wall above the door, and you won't have to worry about covering it. You may want to do the bricks on both sides of the doorways. 

 Another great idea is you can make train tracks on the ground/floor leading into the party room. Tracks leading to other places, like the restroom or kitchen would be fun also.You can use black bulletin board paper cut into long strips and shorter strips that go across. Glue the pieces together and tape securely to the floor.

For the walls in the party room, they can be decorated with handmade train tracks that go all the way around the room.  Again bulletin board paper can be used. You can either make or purchase a good sized Thomas that can be placed on the tracks. You can even add some of Thomas' good friends to the track to fill up empty wall space. Don't forget the train smoke!

 For the table you can use red, blue or both tablecloth. If you have a small tabletop train track, this can be used for the centerpiece with either a nice size Thomas toy in the middle of the track to bring some height to the centerpiece.

 Another decoration for the ceiling could be, using black streamers to make more railroad tracks. Simply cut 2 long strips of streamer, preferably the length of he room. Set them on the floor side by side about a foot  apart. Now take the roll again and cut 1 ft strips. Just enough to finish your tracks. Use glue or tape to attach your tracks to the sides of your tracks. Should resemble a ladder. Now take one end of your tracks and tape it to the wall  right where ceiling meets wall. This is wall A. Take the other end of your track and tape it to the wall directly across from wall A. Now you have a track going across the room. You can make more tracks if you have the room. Two or more tracks would be good. Oh and you can make them droop a little, or you can let them be straight.

You can also make a train station, using refrigerator boxes. Use paint to decorate it.

Use Thomas toys that your child have as decorations. You can make red, blue, black balloon weights. Step by step instructions on how to make these are on my homepage.These can be placed everywhere. In corners, on the mantel, end tables. Anywhere! Attach a couple balloons and...Vola! Time to party!

                                  All Aboard...Choo Choo!!

 I hope these decoration ideas will help you out in a big way. Don't forget to take pictures, I want to see how well you did. Have fun!!!
Search Amazon.com for thomas the train party supplies
Search Amazon.com for thomas the train

Friday, August 13, 2010

Finding Nemo wall decoration and centerpiece/balloon weight

Finding Nemo
Finding Nemo Wall Decoration and Centerpiece/balloon weight

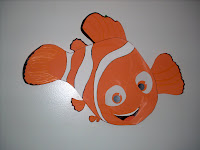
Okay people, I acually thought Nemo was old news...at least in my house.  To my surprise my 2 year old daughter got a glimpse of it at her great-great grandmothers house about a month and a half ago, and has been hooked to it ever since. So she is the reason fo this post. The decorations will go in her room for her to enjoy.  So here are some step by step intructions on how to make a Nemo wall decoration and centerpiece that can also be a balloon weight.


                                      The wall decoration

First you want to make a list of all the supplies you will need to take with you to the store if you don't already have these supplies at home. Also take any inspirational pieces you may have to help you with matching the colors. Mine was my 2 yr olds Nemo floaties.


For this project you will need:

1 white piece of bulletin board paper(posterboard size)
1 sheet copier paper
1 orange posterboard
White paint
Glue
Sissors
Black marker
Yellow marker
Pencil
3 sheets of cardstock light green, blue and orange ( these were on sale 2 for $1 yay!!!)


Okay now that we have all of our supplies lets get busy!

                                          (Don't worry about the tissue paper that was for the next project)

First you get your bulletin board paper and get started on drawing Nemo. This will be your template so you will not have to have all the eraser marks on your Nemo like I did : /  You can erase as much as you please on your template. To draw Nemo I used my inspirational piece and this how-to tutorial that I found online http://www.ehow.com/how_4443906_draw-nemo-from-finding-nemo.html  Since it was the same picture as the floaties.  The template is only needed to get Nemo's shape. You don't have to draw the stripes and eyes.


Sorry about the eraser markes. I didn't think of the template til after I finished the project. Yours will not have these. So then once you have it all drawn out on your template paper, cut it out and place it on top of the orange posterboard and trace with your pencil. Then go over it with the black marker.Add Nemo's stripes and make sure that you make the tips of Nemos fins a little bolder with the marker.


Next you take your white paint and fill in Nemo's stripes


Last you add Nemo's eyes using either the copier paper or left over bulletin board paper. You can go back to the tutorial if you need to for the eyes. I used a piece of the orange posterboard for the eyes, and just colored it in with the black marker for the pupil. Don't forget to use a yellow marker to make the lines on Nemo's fins. I also made the big fin next to his eye after I cut Nemo's body out, because I ran out of room on that side of the paper. There was a little coner left below his body, where I drew the fin separate, then cut it out and glued it to Nemo. But if you have a enough room then go for it.


So now you have a nemo wall decoration. Now your drawing may not look like the oringinal (because mine definitely doesn't) but that is okay. As long as your child reconizes their favorite character, that's all that matters :). You can make 3 more to go on each wall, to make the whole room look more festive.

On my inspirational piece there a flower like shapes that I am going to make to place around Nemo once I place it on the wall. This will make your decorations appear not so plain. So this is where the cardstock comes in handy.


So first we are going to take either color of the paper(I chose blue) and draw the shape of a flower. All you do is at the edge of the paper draw a simple flower pedal with a smaller pedal inside it(above). It can be any size you want. Just be sure that each color flower is a different size


You will need 5 pedals. So it would be easier to cut them out all together so they will all be the same size. Just cut out 5 squares. Sit your pedal on top and cut.

Once you have cut them all out, take your glue and glue the tails of each pedal to another pedal.
You will need to do all of your flowers like this. Remember they need to be different sizes.
And there is your Nemo flowers. They look more like Spongebob flowers but thats okay.=)


                              Nemo Centerpiece/balloon weight

The supplies you need for this project is:


3 sheet of tissue paper blue, orange, and yellow
curling sting (color of your choice, I choce white
Sand (about 3 cups)
clear tape
10x10" tissue paper ( color of choice, it won't be seen)


Okay you are going to take your 3 cups of sand and pour it right in the middle of the 10' tissue paper. Then close it up tight til it resembles a wrapped up hamburger from your favorite fast food chain. Pull tight and tape.

Now take the colored tissue paper and stack, with the orange lying first on the floor then the yellow then blue facing up. Now place the sand pattie right in the middle of  the blue paper.
Now take one corner and pull to the corner diagnal to it. Hold and do the same to the remaining two corners.  Hold  and gather right above the soil pattie(seen above)  and tie in a tight knot with about 2 1/2 feet of the curling ribbon. Once you have the knot. Take your sissors, open them up. Place the ribbon between your thumb and the blade, light press down and pull from the top of the ribbon to the end. (Don't press to hard if you are using extra sharp sissors.) When you get to the end, let go and there you have it...curly curls I like to call them. I have learned that the faster you go the better curl you get.


You can add another 2 1/2 string and have the  curls going all around. Let your imagination flow with them curly curls! I also added Nemo stickers to the bottom and the top part of the centerpiece.
How cuuuute! Oh and don't forget to get a matching tablecloth and sprinkle some Nemo confetti. If you don't have Nemo confetti just use color cordinating confetti. Again this can also be used as a balloon weight. Add about 3 balloons at different heights to give it a unique look. Or maybe just one color or one Nemo balloon. Have fun with your decorations. Surprise everyone at the party with handmade decorations made by "you"!